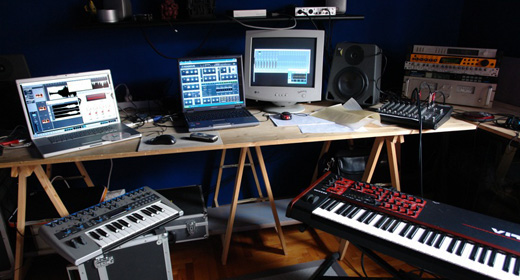
DJ Mojo (aka Joel Semchuck)—Electronic music production, once the realm of the hardcore gear-whore and MIDI magician, has become a much more accessible enterprise with the advent of cheaper, more powerful PCs. The sophistication and performance of both audio interfaces as well as Digital Audio Workstation software has brought the home studio setup within functional equivalence of professional studios. Further, the digital music market has exploded, destroying many of the barriers that prevented up and coming producers from breaking through.
[February—2012] THE following production suggestions are tips I’ve gleaned as I’ve made my way through this arena. This is by no means a comprehensive recipe for how to produce the next killer floorfiller, but rather a number of suggestions in areas I’ve struggled with myself. Areas that, based on comments and questions I’ve seen posted on blogs and forums throughout the web, I know others have struggled with as well. The tips range from the practical to the technical, although the technical suggestions are not platform specific in any way. I can’t guarantee that these follow some time-tested set of standards from the audio engineering bible, and I’m sure there will be points of contention from some who read this. Certainly, there are established techniques and guiding principles, and I will readily admit I’m still a work in progress myself. In fact, I hope to always be learning or at least keep myself open to new processes, techniques and ideas. What I can say is that I’ve found these tips to work for me. And as a fan, student and advocate of electronic music for over two decades now, the one thing I know is that whatever rules there are, are made to be broken. Some of the most amazing sounds, riffs and effects come about through experimentation, or even by complete accident. All I can say is that I hope that some may find these recommendations to be of some value.
1. Establish a Workflow
Let’s face it. Being creative is difficult enough. Taken as a whole, the entire process of production can seem overwhelming. In addition to knowing your way around your computer and/or outboard gear, you need to have a good grasp of your audio software. You have to understand timing and phrasing, although if you have a DJ background this should come much easier. You have to have a basic grasp of music theory; even if you can’t read music you should know what sounds good as far as key relationships. Then there are the complex concepts of synthesis, audio engineering and mastering. Each one of these areas is an entire discipline unto itself, in which one can have a very successful career as a specialist. The producer has to be well-versed in all of these; a jack of all trades. Establishing a routine and consistent workflow will help. You need to know what to do – and, just as important—when to do it. I recommend setting up a couple of “blank” templates in your DAW. In one, have several tracks and basic bus routing set up so that you don’t have to do this every time you start a new project. Have a second template setup just for mastering, especially if you have a mastering plugin that you use frequently. During the creative phase, take notes of any passing ideas that hit you. Even if you don’t end up using these ideas on this track, you have a written record of something that might work in another track. When listening to your mixdowns, also take notes of impressions you get, e.g. the kick is too flat, the vocal’s too quiet, etc. Again, now you will have a written record of changes you make as you make them. Along with this, save your work frequently! There is no greater killer of creativity then having your DAW crash and then trying to backtrack through the last few iterations you performed. Also, save different versions as the track grows. This way, if you make a radical change that ends up not being to your liking, you can revert back. Everyone will have their own unique workflow, but having one is important to maintain focus, build comfort as it becomes routine and avoid being caught up in distracting minutiae.
2. Be organized
Organization has always been a challenge for me. Going back to school was one of the things I credit with making improvement in this area. The bottom line is that good organization will make your workflow that much smoother, freeing up valuable time for actual creative output. Get in the habit of adequately naming all of your tracks in your DAW. Name all of your buses. It’s so easy to just jump in and start doing things, before you know it you have 10 or 20 tracks built up that you will have to label eventually. Might as well just get it done as you go. The same thing applies to patches, effects customizations, etc. Further, know your system’s file structure, know your paths, and keep all of your material strictly isolated to a small and specific set of directories. This includes not only your work files, but your loops, samples, anything related to your music. This makes it easy to find stuff, but also easy to backup. Speaking of backups… this is a must! There are a million ways to back things up now; there is no excuse. I can’t tell you how many horror stories I’ve heard of people losing months of work due to a hard drive going bad or a virus. Don’t let this be you! Another component of organization involves the song structure itself. Become intimately familiar with the structures of the songs that inspire you. Know how they build up, where they breakdown, etc. This doesn’t mean you have to replicate by exact minute or number of bars where things are happening, but just use it as a reference point. Keep the big picture in mind, and then fill in the details. It’s helped me to set up a rough skeleton of the tune first and then treat each major section individually as its own mini song. Finally, if your music is DJ oriented, be DJ friendly. Many of us want to get the wow factor out front early. But for a DJ, it’s nice to have a track that develops slowly so they have a buffer to work into their mix. Keeping melodic elements away from the first few bars is helpful to some DJs, and having a more rhythm oriented bridge or outtro is also helpful to get them into the next track.
3. Get decent monitors
Invest in a decent pair of monitors. You are looking for something with a flat response, and keep in mind that smaller home studio monitors will not be able to produce the lowest sub frequencies. This might require a subwoofer to accurately reproduce. Not your stereo or computer subwoofer! Again, we are looking for accuracy. Many home systems have features that boost various frequencies – especially bass. You do not want this. Along with monitors, a good pair of studio headphones is necessary. You really do need both. Sound in space sounds very different from what’s going on in your headphones. But, your headphones will give you much more detail as far as hearing glitches or artifacts that might be lost on your monitors. There are also very specific guidelines for how to set up your monitors for optimal positioning. To be honest, I don’t currently have the space in my work area to do this. Again, this where headphones can help make up the difference. Lastly, listen to your mixdown and masters on a number of different systems. Listen to them in mono and stereo. Listen on good systems and crap systems. This will give you a much clearer picture of what’s going on with your overall sound. I don’t put any of my stuff out until it’s passed what I call the Truck Test. After I’ve mixed a track down, I take a ride in my truck, as that’s where I actually listen to probably 75% of music. If a track passes the truck test, it’s usually good to go.
4. Max Headroom
Quieter is better. Yes, that’s right. In terms of production work, it’s best to be too quiet rather than not quiet enough. Volume can be addressed in a variety of ways towards the tail end of the production process, particularly in mastering. If you’re working in a digital environment, you typically don’t have to worry about noise and other factors that used to be a concern in analog environments. The headroom number I’ve seen typically thrown around is -6db on your master channel. That is, when all tracks are playing at once, your master channel should not go above -6. I think that’s a pretty good place to start, although lately I’ve actually been shooting for lower numbers at least during the initial mixdown sessions. If your work is too quiet to listen to, just turn up the volume on your monitors or audio interface. Also, make sure none of your individual tracks or buses are going into the red. Digital distortion is a nasty thing, and often cannot be remedied. Better to play it safe. If individual tracks or buses are too quiet in the mix, but you have no room on your volume fader without dipping into red, then it’s time to bring in a compressor. I’ve come to realize that all the elements that I want to be loud and prominent, things like sub bass and such, come out better at the end of the process, if I keep them relatively quiet at the beginning of the process.
5. Enter remix contests
Ok, so here’s one that definitely applies to today’s environment. We are fortunate at this point in time to have online remix competitions. I’m sure most readers already know about this. But it’s something really cool that just wasn’t available until fairly recently. Most of these contests are put on by solid artists or labels and you might even run into one by somebody really big, or someone you really admire. That alone can make it worthwhile; knowing that they are going to listen to you! On a more practical level, this gives you a number of invaluable resources. You get the remix stems to work with, which will help with understanding structure and placement. You will get some exposure out of this. Most of the contests have a forum where everyone participating listens to the other submissions. This also will get you feedback, which is extremely important. But at a more fundamental level, I find the contests to be invaluable as a means to sharpen your chops with other people’s stuff. Let’s face it; it takes time to learn all of this stuff. You might come up with the most amazing riff on your own, but… because you’re still learning how to mixdown properly, or how to control your subs, or what have you, you might not be in the best place on a technical level to really shine. I’m just saying why waste all of your best material when you are still learning to walk? That’s not to say you can’t come back to ideas later when you’re stronger, but isn’t it better to to use another artist’s palette of content as your sandbox? Just my two cents. The other reason I am a strong advocate of these contests, is because it’s a lot easier to build off of existing material, than to start something completely from scratch. And who knows… you might even win something cool!
6. Don’t get caught up in minutiae
Know the difference between experimentation time and “work” time. It’s so easy to get caught up in tweaking a certain synth patch, playing with parameters on some effect; before you know it an hour or two has passed. Establish the basic sound you want, a placeholder, if you will, that is close enough to the sound you are going for. Once you have all the basic elements of your track in place, then you can go in and start tweaking and fine tuning. What’s critical to keep in mind, is the relationship of all of your sounds together. You might have the World’s Greatest Snare that you just spent 3 hours EQing and compressing. Solo’d, it sounds incredible. Snappy and huge and ready to do damage. And then you unsolo it, and it’s kinda tinny and weak. Maybe your kick steals all the thunder, or your lead drowns the snap out. You get the idea. The point is that each sound must work in tandem with all the other sounds and it can be a waste to spend a bunch of time on the front end rather than tightening things up in the entire mix.
7. Find your creative time
This one might seem obvious, but I think it’s worth mentioning. Find your creative time. For me, that time is usually when I first wake up in the morning. I’ve never been a “morning” person, but for some reason, that hazy time when I first wake up is when I seem to really get the creative juices flowing. Obviously, this time will vary for different people. But, operating at a time when you are more relaxed, rather than stressed out about various life issues is probably a good idea. Along with finding the right time, it’s important to take your time. Again, this is something that will vary. If you can bang out quality within a day or two, great. But the entire process should take some time and should not be rushed. We’re often pretty eager to get our stuff out there. With so many social networking avenues available nowadays, it’s tempting to get material out and start getting feedback. But, it’s obviously more ideal to take your time and really be confident with your work than to just rush it out there for instant gratification.
8. Be your own worst critic
Music is a very subjective experience. The bottom line is not everyone is going to like your stuff. And even if they do like your stuff, if the technical aspects are not up to snuff, it really doesn’t matter how great you are on the creative side. That’s why it’s essential to be open to criticism. No, scratch that… actively seek out criticism. Some of this is built into the digital space with social networking—Facebook, Myspace, Twitter, etc. But, friends/family can only get you so far. You want “objective” criticism from others who are already working. It’s one of the reasons I suggest getting started with the remix contests. You’re bound to get some feedback from other participants, but you might even get some feedback from the artists themselves. This is one of the things that makes Soundcloud so wonderful. But, to make Soundcloud work for you, you have to put something back into it. Don’t be a passive clouder—I highly recommend seeking out others in your musical niche, and commenting/faving their material. I’ve found the experience to be rather karmic. It seems like the more time I put into feeding back to others, the more feedback I receive. The good news is that, at least for the time being, Soundcloud is predominantly populated by polite fellow artists or musical enthusiasts. Youtube, on the other hand, can be a jungle. It seems that more and more commenters are looking for personal attention when they comment as opposed to actually providing relevant commentary. That’s just my own personal observation, other than that, I think Youtube’s obviously a great place to promote your content and elicit a response. What’s important is that the feedback you receive is not taken personally, but rather used as a resource to hone your ability. We all have egos, and we all want to hear that our stuff is filthy or dirty or wicked or fire or dope or whatever word marks your tune as “The Best Thing Ever,” but in the long run even if you take a few knocks on your first few tracks and use that information to improve… you stand a much better chance that your next track might just be fire. Or filthy. Or whatever. All that said, the most important critic in your life is the one reading this right now. That’s you. Try to put your ego aside and be completely objective. Seek perfection, don’t just settle for good. One of the things that can help you, particularly on the technical side, is to use reference material. You already know what you like, what general sound you’re shooting for. Use those tracks as reference material. Not just for creative stimulus, but listen to your work side by side with these tracks. This is especially useful during mastering. If you load a reference tune in your mastering project, you can listen to it in direct relation with your song (obviously feed it through a different bus that’s dry). This will allow you to see if your track is at a competitive volume, provide a better sense of their use of EQing and limiting, how they use stereo effects in relation to yours, etc.
9. Learn the frequency space
To be completely honest, this is one of the areas I am still trying to make strides in myself. There is a limited range of frequencies that the human ear can hear. We are more attuned to some of these frequencies than to others, such as the frequency range that the human voice operates in. You are trying to use up as much of the audible frequency spectrum as possible, without having all of your instrumentation fighting to be clearly heard. Now, there are charts that show which types of instruments operate in which ranges. That’s a good start. One of the biggest tools to help you in this area is a spectrum analyzer. This gives you a visual representation of what’s going on in your tune, frequency-wise. Your DAW might already have one, if not, there plenty of plugins out there, even some pretty decent free ones. The ultimate goal is to carve out a distinct frequency space for each of your sounds. EQing is essential in achieving this, as well as using filters (low-pass, high-pass. etc.) Compression is also of value in this area. There are several pretty universal areas where producers struggle with this. For example, getting the kick drum and the bass to play nicely together. Plenty of articles with suggestions on how to deal with this are out there, so I won’t recap them here. However, it’s definitely something to be aware of; you will likely run into this issue at some point. Another tool that can help with frequency conflicts is panning. For example, you might have a funky guitar riff that operates in the same range as a synth lead and overpowers it. You can pan the guitar somewhere to the left and the synth somewhere to the right, allowing the listener’s ear to catch both instruments more clearly. All of these processes should be addressed during the mixdown process, but you can give yourself a head start by being aware of some of these issues during the creative sequence and making some adjustments as you go. This will then allow you to really focus on them and fine tune during your final mixdown sessions.
10. Master separately
The last, but very important, step is mastering, or putting the final touch on your product. Good mastering can make a mediocre track sound better; bad mastering can make a killer track sound dull or worse. In fact, mastering can be such an important step, it might be worth investing in a professional third party mastering session, at least for your first few tracks. A mastering engineer can find and fix issues with the overall frequency spread of your track, increasing clarity where it’s needed most and removing mud. Mastering also brings your overall track up to a competitive volume with other commercial tracks. Additionally, it’s recommended to have a completely objective set of ears, that aren’t so close to the music, perform the mastering. Finally, it’s likely that they have access to gear that is financially out of bounds for most starting producers. Now, if you’re going to master yourself, I recommend getting a dedicated mastering plugin suite. While most of the DAWs come with some mastering capable tools, I believe it is better to go with software that is specifically geared towards mastering. There are a number of fine suites available; the final decision is often based on price, market share, and reviews. One last point on mastering; make it a completely separate process. Save your file as a 24-bit wav file and then open it up in your mastering template and proceed from there. I think approaching the whole process as a completely separate operation is useful. Plus, it helps free up CPU, memory and other resources that might introduce latency or keep your track from sounding optimal.
So there you have it. Music production is difficult and has a pretty steep learning curve. Yet, I’ve found it to be rewarding, and actually rather addictive. I hope this information provides some guidance to anyone struggling out there—or even provides inspiration for someone who has yet to start.
Written by Joel Semchuck. As a part of Los Angeles’ distinctive underground root system of the early 90′s, Joel Semchuck (aka DJ Mojo and/or Mojo Rising), mapped the foundations for some heavyweight events in and around Southern California such as F.A M.I.L.Y. and the old-school Insomniac parties (to name a couple). Joel has a BA in Computer Systems with a Minor in Recording Arts and currently has several releases out on Cold Busted and Journees Music.








![Romanowitch :: A critical season substitute (glitch.cool) — [concise]](https://igloomag.com/wp/wp-content/uploads/2025/03/romanowitch-a-critical-season-substitute_tape_feat-75x75.jpg)


